How to use the Markup editor in the Photos app on iPhone and iPad

A few iOS releases back, Apple introduced a Markup editor in the Photos app. The Markup editor can be access in the Photos app on both iPhone and iPad, and it allows you to draw on photos, highlight specific areas with callouts, add text for fun captions, and more. Here's how to get the most out of the Markup editor in the Photos app, without ever having to download a third-party app!
How to access the Markup editor in the Photos app on iPhone and iPad
Though you can draw on photos and video inside Messages for spur-of-the-moment fun, you can also access a more thorough Markup editor from the Photos app itself. (Just for images, unfortunately — there are no tools available for video at this time.)
- Launch Photos from your home screen.
- Tap the Photos tab in the lower-left corner of the screen.
- Select the photo you want to edit.
- Tap Edit.

- Tap the More (…) button.
- Tap Markup.

You can now add doodles, callouts, and text to your photos.
How to draw on your photos with the Markup editor in the Photos app on iPhone and iPad
Once you're in the Markup editor, the fun begins.
- Tap your preferred drawing tool along the bottom. Your options include a pen, a highlighter, and a pencil. There is also an eraser.
- Tap the color picker circle to the right to choose a color for your drawing tool (except eraser).
- Begin doodling on your photo.

How to change the thickness of your drawing tool in the Markup editor in the Photos app on iPhone and iPad
Want a thinner or thicker line? Here's how to go about doing it.
- Tap your preferred drawing tool along the bottom if not already chosen.
- Tap your drawing tool again to bring up the sizes for that tool.
- Select the thickness of your paintbrush, as well as color opacity.

How to make a callout in the Markup editor in the Photos app on iPhone and iPad
If you want to highlight a specific aspect of your photo, you can add a callout. Here's how!
- While in Markup mode, tap the plus + button, located in the bottom right corner.
- Select Magnifier.
- Touch and drag the callout to highlight any aspect of your image.
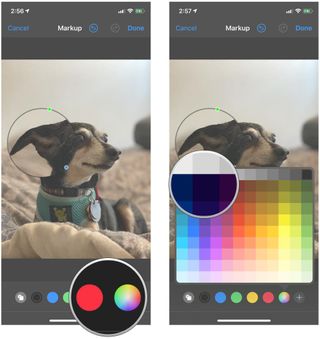
- To adjust the size, touch and slide the blue dot alongside the callout circle.
- To adjust the magnification of the callout, touch and slide the green dot alongside the callout circle.

- To change the color of your callout, just tap on the color you want to use from the color menu at the bottom. There is also a color picker if you want to use a non-standard color.

How to add text to a photo in the Markup editor in the Photos app on iPhone and iPad
Need to add a funny caption to your photo? You're in luck: Markup offers text addition, too.
Master your iPhone in minutes
iMore offers spot-on advice and guidance from our team of experts, with decades of Apple device experience to lean on. Learn more with iMore!
- While in Markup mode, tap the plus + button, located in the bottom right corner.
- Tap Text.
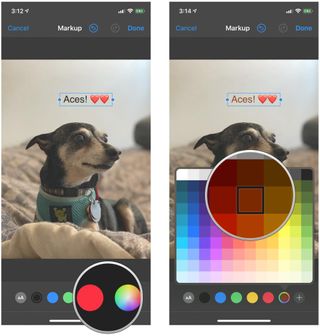
- Drag the blue handles at the ends of the box to make it larger, and touch and drag the entire box to move it around.

- Double-tap the text to go into editing mode, and type in the text you want.
- Tap a color at the bottom if you want to change it — there is also a color picker if the color you want isn't in the standard options.
- Tap anywhere outside the text box to finish.

How to change the font face in the Markup editor in the Photos app on iPhone and iPad
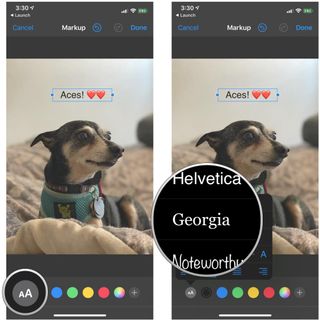
- Tap the Font button in the lower-left corner (it has two As on it).
- Tap Helvetica, Georgia, or Noteworthy to select a font face.

How to change font size in the Markup editor in the Photos app on iPhone and iPad
- Tap the Font button in the lower-left corner (it has two As on it).
- Move the slider to adjust your font size.

How to change text alignment in the Markup editor in the Photos app on iPhone and iPad
- Tap the Font button in the lower-left corner (it has two As on it).
- Tap the text alignment you would like (left, center, right, or justified) in the resulting menu.

How to undo or redo a move in the Markup editor in the Photos app on iPhone and iPad
Made a mistake in your markup? You can quickly undo it with the tap of a button. Just tap the curved arrow to the left if you want to undo, and you can do this as many times as necessary. To redo, just tap the curved arrow to the right.

Questions?
Want to know something else about the Markup editor in the Photos app on iPhone and iPad? Let us know in the comments!
Updated August 2020: Updated for the latest versions of iOS.
Christine Romero-Chan was formerly a Senior Editor for iMore. She has been writing about technology, specifically Apple, for over a decade at a variety of websites. She is currently part of the Digital Trends team, and has been using Apple’s smartphone since the original iPhone back in 2007. While her main speciality is the iPhone, she also covers Apple Watch, iPad, and Mac when needed.
When she isn’t writing about Apple, Christine can often be found at Disneyland in Anaheim, California, as she is a passholder and obsessed with all things Disney, especially Star Wars. Christine also enjoys coffee, food, photography, mechanical keyboards, and spending as much time with her new daughter as possible.
Most Popular


