How to connect to a VPN on your Mac
You've gone ahead and decided to get a VPN (Virtual Private Network) service for your MacBook Pro or other Mac and have chosen one of the best VPN providers that suits your needs. Now what? You connect to it, that's what! And here's how you do it on your Mac or any of the best Macs on the market.
There are two main ways of connecting to your VPN service provider. Either by using the macOS built-in networking framework or the VPN provider's connection application.
How to Connect to the VPN when no third party app is provided
- Click on the Apple icon in the upper left corner of your Mac's screen.
- Click on System Preferences.
- Click Network.
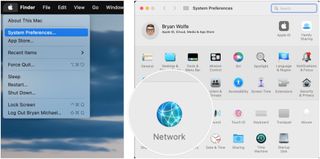
- Click on the lock icon at the bottom left, then login, if applicable.
- Click "+" at the bottom left.
- Select VPN from the drop-down list.
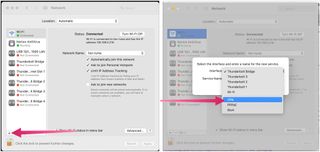
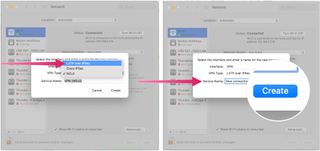
- Select the VPN Type provided by your VPN service provider. In our example, we are using L2TP over IPSec.
- Type in a Service Name that is easy to recognize when you want to connect.
- Click Create.
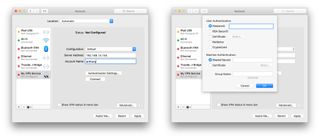
- Type in the Server Address that the VPN service provides you. It may be in the form of an IP address or a Hostname.
- Type in your Account Name (also provided by your VPN).
- Click Authentication Settings. The type of VPN encryption being used by your VPN provider will determine what sort of authentication settings you will need to enter.
- Select the User Authentication method you have been given by your VPN provider and enter the pertinent details. In our example, we will be using Password.
- Select the Machine Authentication required by your VPN provider and enter the pertinent details. In our example, we are using a Shared Secret.
- Click OK.
- Optionally, you can check Show VPN status in the menu bar if you want to enable and disable your VPN connection from the desktop quickly.
- Click Advanced.
- Check Send all traffic over VPN connection to encrypt all of your internet access through the VPN provider. You can check out the pros and cons here.
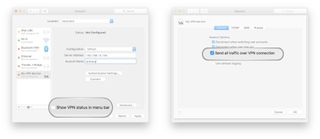
- Click OK.
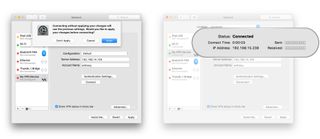
- Click Apply.
- Click Connect to start your VPN Connection.
How to connect to the VPN with your VPN provider's App
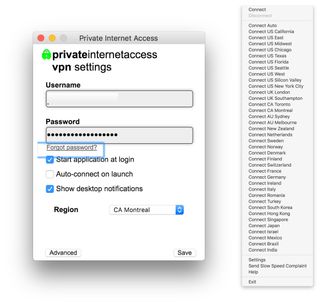
Many VPN service providers like NordVPN, IPVanish, TunnelBear, ExpressVPN, and more, offer applications you can install, which will automatically set up your VPN settings and give you easy access to start/stop your VPN connection. In most instances, you'll simply be required to install the application and enter your account credentials, and then you're up and running. In our screenshots below, we're showing the efficacy in selecting a VPN server in various parts of the world using the PIA service app.
Other resources
If you'd like to get more information on VPNs, VPN service providers, or want to get into more detail on how VPNs function, our pals at Android Central have a VPN hub with lots of great resources available. Additionally, be sure to check out Android Central's current VPN deals. You'll be happy you did!
Want to set up a VPN on your other Apple devices? Check out our how to configure a VPN on iPhone or iPad guide to get started.
We test and review VPN services in the context of legal recreational uses. For example:
1. Accessing a service from another country (subject to the terms and conditions of that service).
Master your iPhone in minutes
iMore offers spot-on advice and guidance from our team of experts, with decades of Apple device experience to lean on. Learn more with iMore!
2. Protecting your online security and strengthening your online privacy when abroad.
We do not support or condone the illegal or malicious use of VPN services. Consuming pirated content that is paid-for is neither endorsed nor approved by Future Publishing.

Bryan M. Wolfe has written about technology for over a decade on various websites, including TechRadar, AppAdvice, and many more. Before this, he worked in the technology field across different industries, including healthcare and education. He’s currently iMore’s lead on all things Mac and macOS, although he also loves covering iPhone, iPad, and Apple Watch. Bryan enjoys watching his favorite sports teams, traveling, and driving around his teenage daughter to her latest stage show, audition, or school event in his spare time. He also keeps busy walking his black and white cocker spaniel, Izzy, and trying new coffees and liquid grapes.
Most Popular


