Note: CloudBerry Lab provided a Pro version of CloudBerry Backup and storage space on an Amazon S3 server for purposes of this review.
When Apple introduced Time Machine as a part of Mac OS X Leopard in 2007, the company estimated that only one percent of Mac users backed up their data automatically.
Time Machine was a big step forward in helping Mac users back up their data to an external device. But any good backup plan should include an offsite backup as well. That used to mean asking a relative or neighbor to hold on to an external hard drive filled with your data. These days, however, an offsite backup is typically accomplished by uploading data to a site on the internet and gains a fancy new marketing name: cloud backup.
There are a number of companies that sell storage space on the internet for backups, and many of them offer their own software to upload data to their storage sites. However, they vary in simplicity and accessibility. If you want greater control of which files get backed up and a host of other features, you might want to check out CloudBerry Backup.
CloudBerry Lab introduced its software for the Mac in July 2015 and it's undergone consistent updates since then.
Simply put, CloudBerry Backup for Mac serves as a conduit between your Mac and your cloud storage vendor. You tell CloudBerry Backup what files you want backed up where and when, and the software takes it from there. In addition, there's an option to back up data to a hard drive connected to the Mac.

Price: $30Bottom line: If you want greater control of which files get backed up, want to encrypt the files, or want back up your data to more than one cloud storage location for safety's sake, then CloudBerry Backup might just be for you.
Pros
- Full-featured; pro version includes encryption, compression, and file versions.
- Works with multiple cloud storage vendors.
- Backup plans execute in the background, even without logging in.
Cons
- You need storage from a third-party provider
- Backing up multiple home folders requires creating a separate backup plan for each.
About CloudBerry Backup
CloudBerry Lab lists the following requirements to run CloudBerry Backup: a Mac running Mac OS X 10.8 or newer, a 1.1 GHz 64-bit processor, 512MB of RAM, 100MB minimum of disk space, and Gigabit ethernet.
The software currently works with more than a dozen third-party storage vendors, including Amazon S3 and Glacier, Microsoft Azure, Google Cloud Storage, OpenStack, Rackspace, HP Cloud, Backblaze B2, and many more. CloudBerry Lab does not offer storage; you have to secure that yourself from a third-party storage provider.
CloudBerry Backup comes in two versions:
- Freeware: Designed for personal use, it has a 200 GB storage limit and is (as its name states) free.
- Pro: Unlimited storage and advanced options for encryption and compression for $30. The Pro version also comes with a 15-day trial.
Set up the backup storage
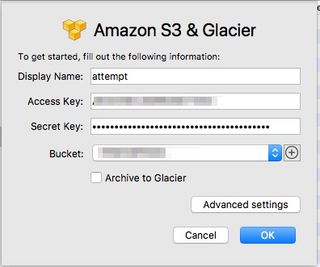
Once you have your cloud storage secured, you give CloudBerry Backup the details. These details (such as Access Key, Endpoint, Bucket, Container, etc.) vary by provider, and CloudBerry Backup will ask for the details it needs, based upon the provider you choose.
We used an Amazon S3 amount provided by CloudBerry Lab to evaluate the software.
The Assistant Steps In
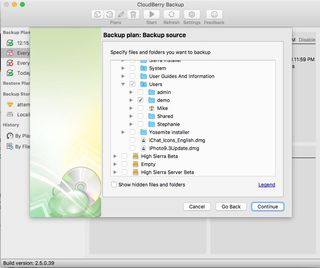
Cloudberry Backup provides an easy-to-use assistant to create Backup Plans. After identifying the Backup Storage location(s), you name the Backup Plan.
From there you identify exactly what data you want to back up. Unlike Time Machine's "Everything Gets Backed Up" simplicity, with CloudBerry Backup, you have fine-grained control down to the individual file level.
You can choose to back up (or not back up) files with certain extensions (such as .txt or .jpg). You can also choose to skip system files, hidden files, and empty folders.
CloudBerry Backup won't back up any files for which it doesn't have access. So for example, let's imagine that two users— Anne and Bob —share a Mac. Anne can create a Backup Plan that will back up her own home folder. If she tries to include Bob's home folder in her Backup Plan, when the backup runs, it will report as failed because even though Anne's home folder will be backed up correctly, the Backup Plan can't access the contents of Bob's home folder.
There's a way around this limitation, but it involves fiddling with file permissions. It's easier for Anne and Bob to each create a separate Backup Plan that contains their own home folder.
With the Pro version of CloudBerry Backup, you can choose to compress and/or encrypt your data and take advantage of features that the cloud storage server may offer, such as server-side encryption. The encryption that CloudBerry Backup performs is done on your Mac before your data is uploaded to your cloud storage via the HTTPS protocol.
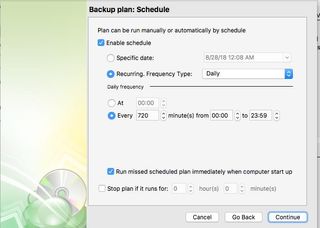
CloudBerry Backup allows for the retention of multiple versions of files and can also automatically delete older versions. Backup plans can be set to run on a schedule, either on specific dates or with recurring frequencies. For example, you can easily create a Backup plan that will run twice a day at midnight and noon. When a backup plan completes, users can be notified via email.
Backing up
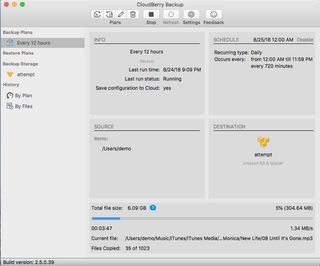
We created a demo account and filled it with photos, calendar events, email, reminders, and various documents. We made a Backup Plan to back up the demo home directory twice a day.
CloudBerry Backup initially uploaded about 13.5GB of data (a little over 7,000 files) to an Amazon S3 cloud storage bucket in about two hours and 47 minutes. The time to complete this task will vary, naturally, based on your network's upload speed and local network traffic.
Additional backups ran every 12 hours and backed up only the files that had changed. We altered the Backup plan to include more data, and CloudBerry Backup handled the changed data with ease.
CloudBerry backup ran successfully even when no users were logged in and the app was not open.
Restoring Data
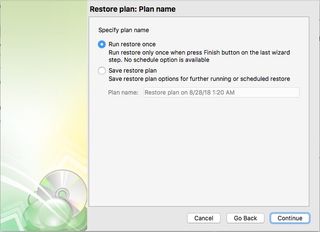
As with backing up data, you create a plan to restore data using an assistant that walks you through the process. You'll be given the option to create a restore plan that you might want to schedule to use in the future, or a one-time plan without a schedule.
In addition to selecting only certain files to restore, you can choose to restore the latest version of those files, or a version from a particular point in time. You can also choose to restore the files to either their original locations or a different location.
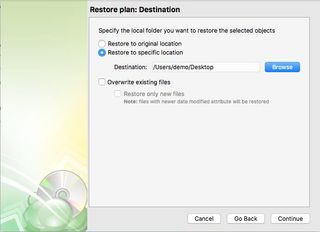
As with backup plans, you can choose to be notified when the restore process is complete.
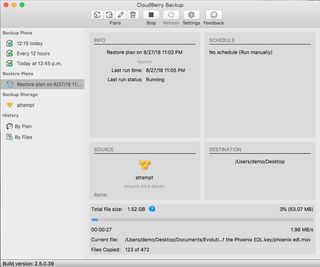
We ran several restore tests, and CloudBerry Backup successfully restored all the data we asked for.
A few more details
The settings for CloudBerry Backup can be tweaked to specify how many threads and how much bandwidth the software should use when performing backups and restores. You can also use CloudBerry Backup to back up your data to a local hard drive, including network shares and NAS devices.
Is It For You?
If you're doing cloud backups—particularly with more than one vendor—or you need fine-grained control or features that your vendor's software doesn't provide, you might want to take CloudBerry Backup out for a spin. It's easy to use and flexible enough to work with multiple cloud storage vendors in one consistent interface.
○ Backing up: The ultimate guide
○ Best backup services and programs for your Mac
○ Best cloud service apps for your iPhone and iPad
○ How to back up your Mac
○ How to back up your iPhone and iPad
○ How to back up your Apple TV
○ How to back up your Apple Watch
○ How to restore your Mac from a backup
○ How to restore your iPhone or iPad from a backup
○ How to restore your Apple Watch from a backup
○ How to recover your files when you don't have a backup
Mike Matthews is a writer at iMore.com. He has used Apple products all the way back to the Apple II+. He appreciates no longer having to launch apps by loading them from a cassette tape recorder.
